Keep and carry on.

背景:

​ 某些情况下需要使用第三方的sdk, 但是第三方sdk大部分是将jar/aar文件离线提供的, 不方便公司内部各个APP 集成, 需要将aar上传到公司的maven仓库中, 可以使用mvn命令手动生成aar/jar文件的xml格式的pom文件.

使用如下

在${user}/.m2/repository目录下执行如下命令

mvn install:install-file 
#parameters
-Dfile= 
-DgroupId= # com.xxx.xxx
-DartifactId= #project id
-Dpackaging= # aar / jar 
-DgeneratePom= #genegerate pom file or not
-Dversion= #versioncode

活学活用, 现学现用, 后面记录.

Read More
post @ 2019-09-26

集合框架

先用一张图概览一下Java的集合框架

Read More
post @ 2019-09-26

[TOC]

ArrayList

简介

ArrayList实现了List的接口, 是一个顺序存储的容器, 允许放入null元素,底层通过数组实现, 线程非安全.ArrayList有一个capacity表示容量, 如果在向容器中添加元素且容量不足的时候, 容器会自增大底层数组的大小.

Read More

[TOC]

包结构与架构

包的结构与说明

universalimageloader| 

    |-cache
        |-disc
        |-memory
    |-core
        |-assist
        |-decode
        |-display
        |-download
        |-imageaware
        |-listener
        |-process
    |-utils

整体设计架构与说明

结构图表示

UIL

各模块的说明

整个库一级划分为cache, core , util 三个大模块.

  1. core: 核心模块分为decode(解码), display(展示),download(下载), imageAware(显示图片的包装),process(处理图片) 五个重要的模块.此外,尤其要注意

    ImageLoaderEngine, ImageDecorder, BitmapDisplayer, BitmapProcessor, ImageDownloader, ImageAware 这几个重要的类.

  2. cache: 缓存模块分为disc缓存和memory缓存两个模块

  3. utils:工具类模块, 如缓存工具类|Log|图像处理等.

加载图片流程

用一张图简单的标识图片加载流程

加载流程图

UIL流程图1

详细执行流程

加载的时序图

loadImage本质也是调用displayImage因此直接看displayImage的执行流程即可.

ImageLoader.getInstance().displayImage(uri, imageview, options, listener);

UIL时序图

有缓存的时候, 先去检查缓存.参考流程图

DisplayTask 的详细执行流程图

参考LoadAndDisplayimageTask中的run方法

LoadAndDisplayImageTask

//TODO UML

缓存算法详解

包结构

缓存算法从缓存位置上划分为两种, memorydisc.

|-cache
    |-disc
        |-impl(具体实现)
        |-naming(文件命名工具)
        |-DiskCache:interface(对外接口)
    |-memory
        |-impl(具体实现)
        |-BaseMemoryCache
        |-LimitedMemoryCache
        |-MemoryCache:interface(对外接口)

UML

内存缓存

memocache

磁盘缓存

解码器与下载器

//BaseImageDownloader
//根据URI的类型, 获取不同的InputStream
@Override
    public InputStream getStream(String imageUri, Object extra) throws IOException {
        switch (Scheme.ofUri(imageUri)) {
            case HTTP:
            case HTTPS:
                return getStreamFromNetwork(imageUri, extra);
            case FILE:
                return getStreamFromFile(imageUri, extra);
            case CONTENT:
                return getStreamFromContent(imageUri, extra);
            case ASSETS:
                return getStreamFromAssets(imageUri, extra);
            case DRAWABLE:
                return getStreamFromDrawable(imageUri, extra);
            case UNKNOWN:
            default:
                return getStreamFromOtherSource(imageUri, extra);
        }
    }
//BaseImageDecoders
//将inputStream解码为Bitmap类型

@Override
    public Bitmap decode(ImageDecodingInfo decodingInfo) throws IOException {
        Bitmap decodedBitmap;
        ImageFileInfo imageInfo;

        InputStream imageStream = getImageStream(decodingInfo);
        if (imageStream == null) {
            L.e(ERROR_NO_IMAGE_STREAM, decodingInfo.getImageKey());
            return null;
        }
        try {
            imageInfo = defineImageSizeAndRotation(imageStream, decodingInfo);
            imageStream = resetStream(imageStream, decodingInfo);
            Options decodingOptions = prepareDecodingOptions(imageInfo.imageSize, decodingInfo);
            decodedBitmap = BitmapFactory.decodeStream(imageStream, null, decodingOptions);
        } finally {
            IoUtils.closeSilently(imageStream);
        }

        if (decodedBitmap == null) {
            L.e(ERROR_CANT_DECODE_IMAGE, decodingInfo.getImageKey());
        } else {
            decodedBitmap = considerExactScaleAndOrientatiton(decodedBitmap, decodingInfo, imageInfo.exif.rotation,
                    imageInfo.exif.flipHorizontal);
        }
        return decodedBitmap;
    }
Read More

[TOC]

写在前面

AUIL 的特点

  • 多线程下载图片(同步异步)
  • 提供多种ImageLoader的用户配置(thread executors, downloaders,decoder, memory and disk cache, display image options, etc.)
  • 为每一个显示图片的调用提供了非常丰富的配置(stub image, caching switch, decoding options, Bitmap processing and displaying, etc)
  • 提供图片的内存和文件缓存
  • 图片加载的监听和下载进度的监听

使用

QuickSetup

  1. include library

    implementation 'com.nostra13.universalimageloader:universal-image-loader:1.9.5'
    
  2. config manifest permission

    manifest>
        <!-- Include following permission if you load images from Internet -->
        <uses-permission android:name="android.permission.INTERNET" />
        <!-- Include following permission if you want to cache images on SD card -->
        <uses-permission android:name="android.permission.WRITE_EXTERNAL_STORAGE" />
        ...
    </manifest>
    
  3. config imageloader and initial

    public class MyActivity extends Activity &#123;
        @Override
        public void onCreate() &#123;
            super.onCreate();
    
            // Create global configuration and initialize ImageLoader with this config
            ImageLoaderConfiguration config = new ImageLoaderConfiguration.Builder(this)
                ...
                .build();
            ImageLoader.getInstance().init(config);
            ...
        &#125;
    &#125;
    
  4. Display Options

    // DON'T COPY THIS CODE TO YOUR PROJECT! This is just example of ALL options using.
    // See the sample project how to use ImageLoader correctly.
    DisplayImageOptions options = new DisplayImageOptions.Builder()
            .showImageOnLoading(R.drawable.ic_stub) // resource or drawable
            .showImageForEmptyUri(R.drawable.ic_empty) // resource or drawable
            .showImageOnFail(R.drawable.ic_error) // resource or drawable
            .resetViewBeforeLoading(false)  // default
            .delayBeforeLoading(1000)
            .cacheInMemory(false) // default
            .cacheOnDisk(false) // default
            .preProcessor(...)
            .postProcessor(...)
            .extraForDownloader(...)
            .considerExifParams(false) // default
            .imageScaleType(ImageScaleType.IN_SAMPLE_POWER_OF_2) // default
            .bitmapConfig(Bitmap.Config.ARGB_8888) // default
            .decodingOptions(...)
            .displayer(new SimpleBitmapDisplayer()) // default
            .handler(new Handler()) // default
            .build();
    

Usage

可接受的的URI资源示例

"http://site.com/image.png" // from Web
"file:///mnt/sdcard/image.png" // from SD card
"file:///mnt/sdcard/video.mp4" // from SD card (video thumbnail)
"content://media/external/images/media/13" // from content provider
"content://media/external/video/media/13" // from content provider (video thumbnail)
"assets://image.png" // from assets
"drawable://" + R.drawable.img // from drawables (non-9patch images)

NOTE: Use drawable:// only if you really need it! Always consider the native way to load drawables - ImageView.setImageResource(...) instead of using of ImageLoader.

简单使用

// Load image, decode it to Bitmap and display Bitmap in ImageView (or any other view 
//    which implements ImageAware interface)
ImageLoader imageLoader = ImageLoader.getInstance();
imageLoader.loadImage(imageUri, imageview);
// Load image, decode it to Bitmap and return Bitmap to callback
imageLoader.loadImage(imageUri, new SimpleImageLoadingListener() &#123;
    @Override
    public void onLoadingComplete(String imageUri, View view, Bitmap loadedImage) &#123;
        // Do whatever you want with Bitmap
    &#125;
&#125;);
// Load image, decode it to Bitmap and return Bitmap synchronously
Bitmap bmp = imageLoader.loadImageSync(imageUri);

完全使用

// Load image, decode it to Bitmap and display Bitmap in ImageView (or any other view 
//    which implements ImageAware interface)
imageLoader.displayImage(imageUri, imageView, options, new ImageLoadingListener() &#123;
    @Override
    public void onLoadingStarted(String imageUri, View view) &#123;
        ...
    &#125;
    @Override
    public void onLoadingFailed(String imageUri, View view, FailReason failReason) &#123;
        ...
    &#125;
    @Override
    public void onLoadingComplete(String imageUri, View view, Bitmap loadedImage) &#123;
        ...
    &#125;
    @Override
    public void onLoadingCancelled(String imageUri, View view) &#123;
        ...
    &#125;
&#125;, new ImageLoadingProgressListener() &#123;
    @Override
    public void onProgressUpdate(String imageUri, View view, int current, int total) &#123;
        ...
    &#125;
&#125;);
// Load image, decode it to Bitmap and return Bitmap to callback
ImageSize targetSize = new ImageSize(80, 50); // result Bitmap will be fit to this size
imageLoader.loadImage(imageUri, targetSize, options, new SimpleImageLoadingListener() &#123;
    @Override
    public void onLoadingComplete(String imageUri, View view, Bitmap loadedImage) &#123;
        // Do whatever you want with Bitmap
    &#125;
&#125;);
// Load image, decode it to Bitmap and return Bitmap synchronously
ImageSize targetSize = new ImageSize(80, 50); // result Bitmap will be fit to this size
Bitmap bmp = imageLoader.loadImageSync(imageUri, targetSize, options);

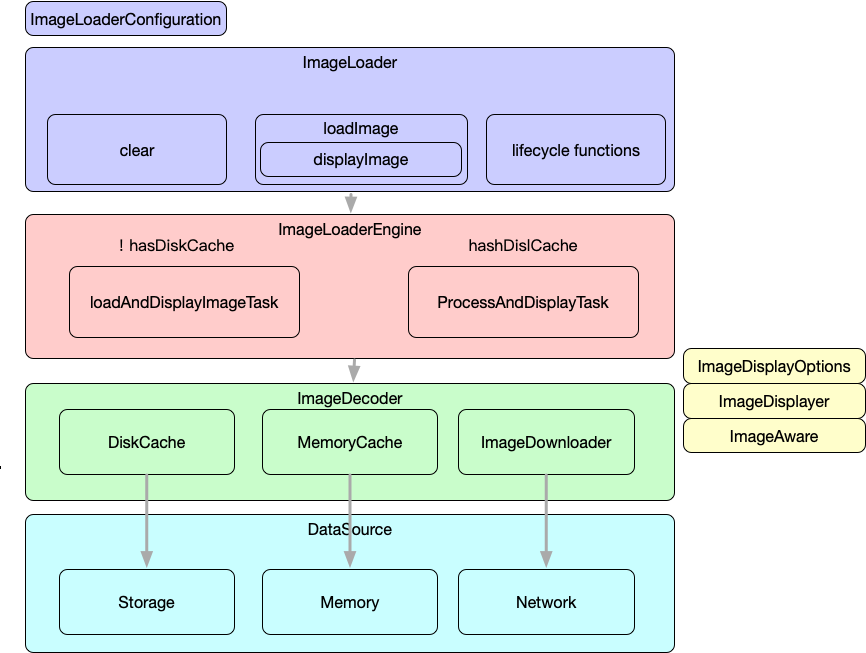
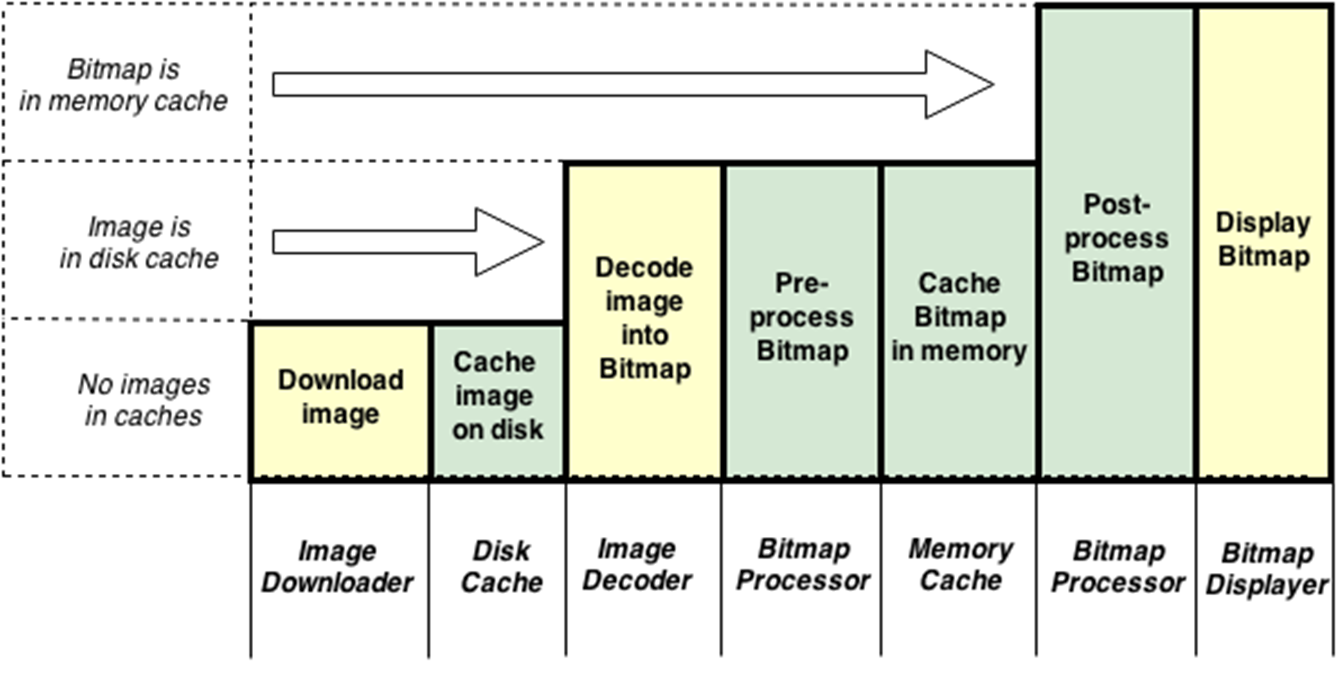
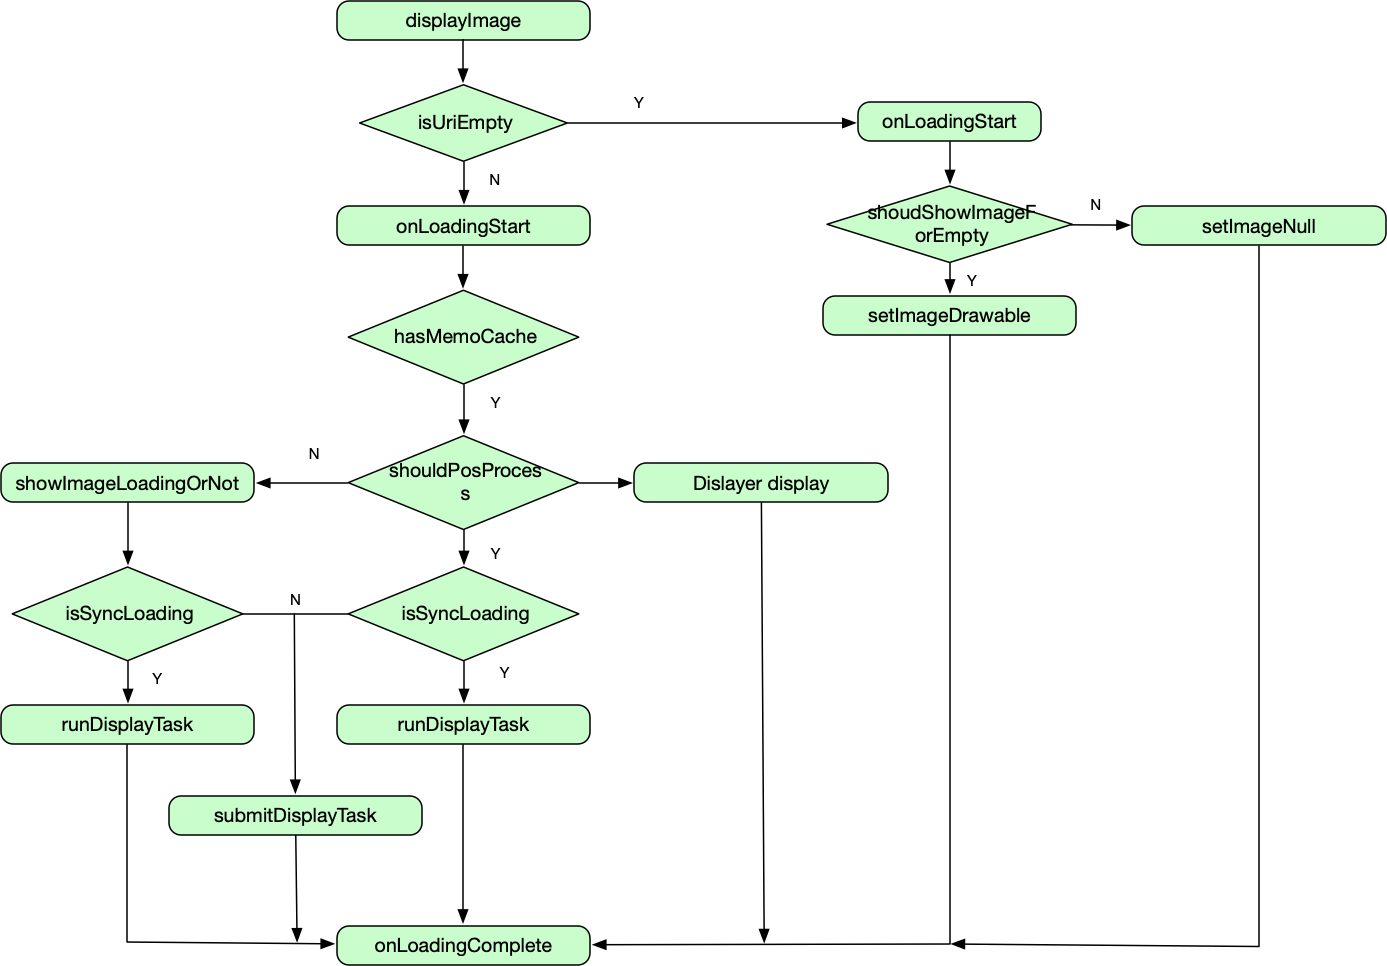
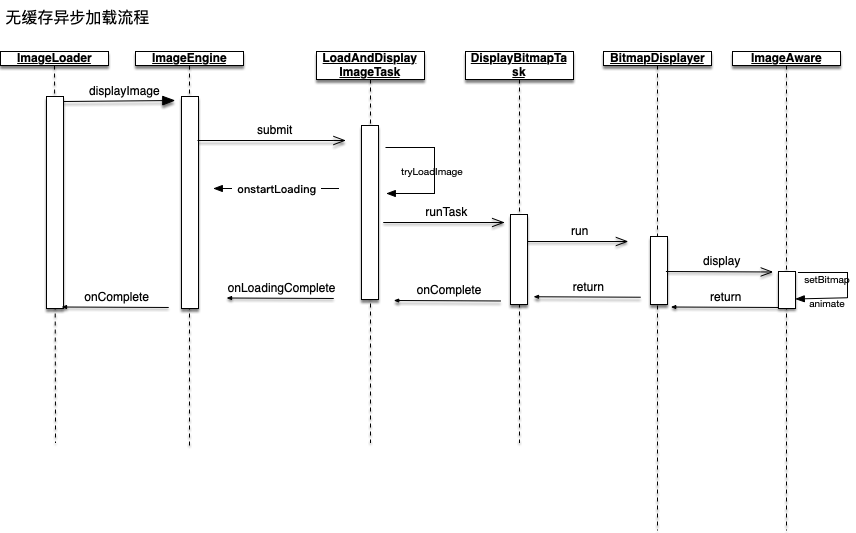
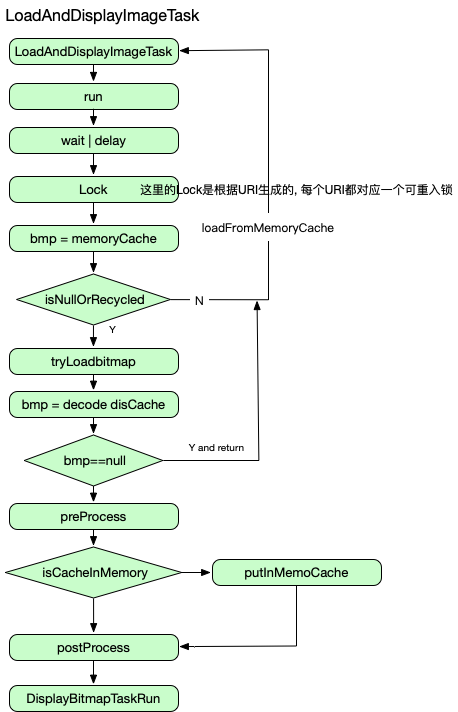
Load & Display Task Flow

重要, 这个是AUIL的加载图片流程

AUIL

用户须知

  1. Caching is NOT enabled by default如果需要开启内存或者是磁盘缓存,需要配置DisplayImageOptions

    // Create default options which will be used for every 
    //  displayImage(...) call if no options will be passed to this method
    DisplayImageOptions defaultOptions = new DisplayImageOptions.Builder()
               ...
               .cacheInMemory(true)
               .cacheOnDisk(true)
               ...
               .build();
    ImageLoaderConfiguration config = new ImageLoaderConfiguration.Builder(getApplicationContext())
               ...
               .defaultDisplayImageOptions(defaultOptions)
               ...
               .build();
    ImageLoader.getInstance().init(config); // Do it on Application start
    
    // Then later, when you want to display image
    ImageLoader.getInstance().displayImage(imageUrl, imageView); // Default options will be used
    

    或者这样:

    DisplayImageOptions options = new DisplayImageOptions.Builder()
               ...
               .cacheInMemory(true)
               .cacheOnDisk(true)
               ...
               .build();
    ImageLoader.getInstance().displayImage(imageUrl, imageView, options); // Incoming options will be used
    
  2. 注意WRITE_EXTERNAL_STORAGE这个权限的申请.

  3. 如果发生OOM可以尝试关掉内存缓存, 或减少线程池的大小, 或使用RGB-565的图像配置替换ARGB-8888, 或者裁剪图片显示小图.

  4. MemoryChache的配置

    1. 强引用 LruMemoryCache
    2. 强弱引用混用 1,3除外的算法.
    3. 只是用弱引用 WeakMemoryCache
  5. DiscChache也是可配置的UnlimitedDiscCache 是最快的,但是占用存储空间

  6. 使用RoundedBigmaDisplayerFadeInbitmapDisplayer 装饰图片加载

  7. 为了是ListView or GrideView的性能提升, 使用PauseOnScrollListener

    boolean pauseOnScroll = false; // or true
    boolean pauseOnFling = true; // or false
    PauseOnScrollListener listener = new PauseOnScrollListener(imageLoader, pauseOnScroll, pauseOnFling);
    listView.setOnScrollListener(listener);
    
  8. If you see in logs some strange supplement at the end of image URL (e.g. http://anysite.com/images/image.png_230x460) then it doesn’t mean this URL is used in requests. This is just “URL + target size”, also this is key for Bitmap in memory cache. This postfix (_230x460) is NOT used in requests.

Read More
post @ 2017-12-27

[TOC]

Android JNI 基本知识

1.1 什么是JNI

JNI (Java Native Interface),它提供了若干API使得Java可以和其他语言互通,是JDK的一部分.

理解这些就可以了!

1.2 为什么使用JNI

使用JNI是为了将现有的C或C++库集成到使用Java语言开发的应用中,或者有些性能要求较高的场景下,使用CC++才能满足的场景.

1.3 使用JNI带来的问题

程序不再跨平台,还有JNI带来的内存问题,以及可能引起的Crash

使用Android Studio 搭建JNI开发环境

目前使用Android Studio 3.0可以直接建立一个支持C或C++语言的JNI项目.

如果需要将现有的应用集成JNI可参照Google Dev的官方文档操作.

编译JNI程序,可以使用NDK编译,或者使用CMAKE来编译,现在来讲都可行,推荐使用CMAKE来编译.

app目录下建立一个JNI目录源文件都放到这里.

error

jni2

注意目录名称是JNI,只是在Android Studio中显示为cpp目录

下面写CMAKE文件

# 这里使用的是bsdiff patch的JNI库例子.
# For more information about using CMake with Android Studio, read the
# documentation: https://d.android.com/studio/projects/add-native-code.html

# Sets the minimum version of CMake required to build the native library.
# 设置CMake编译器的版本
cmake_minimum_required(VERSION 3.4.1)

# Creates and names a library, sets it as either STATIC
# or SHARED, and provides the relative paths to its source code.
# You can define multiple libraries, and CMake builds them for you.
# Gradle automatically packages shared libraries with your APK.
# 声明源文件路径
file(GLOB bzip "src/main/jni/bzip2/*.c")
file(GLOB bs_src "src/main/jni/*.c")
# 引入头文件路径 (这里必须要引入)
include_directories(
"src/main/jni/bzip2/"
)
# 引入源文件
add_library( # Sets the name of the library.
             # 设置编译后的库名称
             native-lib

             # Sets the library as a shared library.
             SHARED

             # Provides a relative path to your source file(s).
             # 设置源文件的位置
             ${bzip}
             src/main/jni/native-lib.c )

# Searches for a specified prebuilt library and stores the path as a
# variable. Because CMake includes system libraries in the search path by
# default, you only need to specify the name of the public NDK library
# you want to add. CMake verifies that the library exists before
# completing its build.

find_library( # Sets the name of the path variable.
              log-lib

              # Specifies the name of the NDK library that
              # you want CMake to locate.
              # 引入依赖库
              log )

# Specifies libraries CMake should link to your target library. You
# can link multiple libraries, such as libraries you define in this
# build script, prebuilt third-party libraries, or system libraries.

target_link_libraries( # Specifies the target library.
                       native-lib
                        
                       # Links the target library to the log library
                       # included in the NDK.
                       ${log-lib} )

简单的来一个JNI HelloWorld

public class MainActivity extends AppCompatActivity &#123;

    static &#123;
        System.loadLibrary("native-lib");
    &#125;

    @Override
    protected void onCreate(Bundle savedInstanceState) &#123;
        super.onCreate(savedInstanceState);
        setContentView(R.layout.activity_main);
    &#125;
    
    public static native String helloworld();
&#125;
#include <jni.h>
JNIEXPORT jstring JNICALL
Java_com_sankuai_meituan_testjni_MainActivity_helloworld(JNIEnv *env, jclass type) &#123;
    return (*env)->NewStringUTF(env, "hello world");
&#125;

C的函数定义中可以发现,函数的签名是有一定规律的一般是下面这种格式

Java_[包名]_[类名]_[方法名](JNIEnv * env,jclass type,[params])

Read More
post @ 2017-12-13

[TOC]

Andorid IPC

Android中的多进程模式

1. 开启多进程模式

在Android中,开启多进程的方式是给四大组件(静态注册),加上process属性,让其运行在其他进程,默认的进程的名称为包名.

例如:

<activity 
          android:name=".MainActivity"
          android:process=":remote">
</activity>
<activity
          android:name=".SecondActivity"
          android:process="[包名].remote"
          >
</activity>

这个MainActivity将运行在包名+:remote这个名称的进程中.而SecondActivity将运行在[packageName].remote这个进程中.

二者区别:

加冒号':'这种方式是在当前进程名称前面附加上当前应用的包名,是一种简写方式;对于SecondActivity来说是完整的进程命名.此外,加冒号这种方式运行的进程是当前应用的私有进程,其他应用的组件不可以和它运行在同一个进程中,而采用完整命名的进行是全局进程,其他应用通过ShareUID方式可以和它运行在同一个进程中.

Android系统会给每个应用分配一个唯一的UID,具有相同UID的应用才能共享数据,两个应用听过ShareUID运行在同一个进程是有要求的,这两个应用必须有相同的ShareUID并且包签名相同才可以.

2. 多进程模式的运行机制

多进程所带来的问题

  • 静态成员和单例完全失效
  • 线程同步机制完全失效
  • SharePreference的可靠性下降(SP只是做了线程同步喂)
  • Application多次创建

IPC 基础概念

1. Serializable

public class User implements Serializable &#123;
    private static final long serialVersionUID = -6081784905993904744L;
    private String name;
    private int age;
    private int id;
  
    public User(String name,int age,int id)&#123;
        this.name = name;
        this.age = age;
        this.id = id;
    &#125;

    public static long getSerialVersionUID() &#123;
        return serialVersionUID;
    &#125;

    public String getName() &#123;
        return name;
    &#125;

    public void setName(String name) &#123;
        this.name = name;
    &#125;

    public int getAge() &#123;
        return age;
    &#125;

    public void setAge(int age) &#123;
        this.age = age;
    &#125;

    public int getId() &#123;
        return id;
    &#125;

    public void setId(int id) &#123;
        this.id = id;
    &#125;
&#125;

序列化与反序列化User

//序列化
User user = new User("duo",20,1001);
ObjectOutputStream oos = new ObjectOutputStream(new FileOutputStream("test.txt"));
oos.writeObject(user);
oos.close();

//反序列化
 ObjectInputStream ois = new ObjectInputStream(new FileInputStream("test.txt"));
 User user2 = (User) ois.readObject();
 ois.close();

2. Parcelable

parcelable是Android提供的一种序列化和反序列化方式,它比Serializable效率更高一些.


import android.os.Parcel;
import android.os.Parcelable;

/**
 * Created by hefuduo on 2017/12/13.
 */

public class User implements Parcelable &#123;
    public int id;
    public String name;
    public int age;

    public User(int id, String name, int age) &#123;
        this.id = id;
        this.name = name;
        this.age = age;
    &#125;

    protected User(Parcel in) &#123;
        name = in.readString();
        age = in.readInt();
        id = in.readInt();
    &#125;

    public static final Creator<User> CREATOR = new Creator<User>() &#123;
        @Override
        public User createFromParcel(Parcel in) &#123;
            return new User(in);
        &#125;

        @Override
        public User[] newArray(int size) &#123;
            return new User[size];
        &#125;
    &#125;;

    @Override
    public int describeContents() &#123;
        return 0;
    &#125;

    @Override
    public void writeToParcel(Parcel dest, int flags) &#123;
        dest.writeString(name);
        dest.writeInt(age);
        dest.writeInt(id);
    &#125;
&#125;

3. Binder

Read More
post @ 2017-08-28
Read More
post @ 2017-08-28

[TOC]

Groovy :MOP与元编程

在Java中,使用反射可以在运行时探索程序的结构,以及程序的类,累的方法,方法接受的参数.然而,我们仍然局限于所创建的静态结构.我们无法在运行时修改一个对象的类型,或是让它动态获取行为–至少现在还不能.如果可以基于应用的当前状态,或者是基于应用所接受的输入,动态地添加方法和行为,代码就会变得更加灵活,我们创造力和开发效率也会提高.那么Groovy就是提供了这一功能

*元编程(metaprogramming)*意味着编写能够操作程序的程序,包括操作程序自身.像Groovy这样的动态语言通过元对象协议(MetaObject Protocal, MOP)提供了这种能力.利用Groovy的MOP,创建类,编写单元测试和引入模拟对象都是很容易的.

在Groovy中,使用MOP可以动态的调用方法,甚至可以在运行时合成类和方法.该特性让我们有这种感觉:对象顺利地修改了它的类.

讨论两个方面:Groovy对象的组成和Groovy如何解析Java对象和Grooy对象的方法调用.

探索元对象

Groovy 对象

Groovy对象是带有附加功能的Java对象.在Groovy中,Groovy对象比编译好的Java对象具有更多的动态行为.

在一个Groovy应用中,我们会使用三类对象:POJO,POGO和Groovy拦截器.

查询方法和属性

调用一个方法

str = "hello"
methodName = 'toUpperCase'

methodOfInterest = str.metaClass.getMetaMethod(methodName)
println methodOfInterest.invoke(str)

respondsTo方法判断是否存在方法

str = "hello"
println String.metaClass.respondsTo(str,'toUpperCase') ? 'yes' : 'no'  //yes
println String.metaClass.respondsTo(str,'compareTo',"test") ? 'yes' : 'no' //yes
println String.metaClass.respondsTo(str,'toUpperCase', 5) ? 'yes' : 'no' //no

动态的访问对象

除了前面介绍的方法和属性的查询方式和动态调用方式,Groovy还有其他比较方便的访问属性和调用方法的方式.一下为例子.

def printInfo(obj)&#123;
    usrRequestedProperty = 'bytes'
    usrRequestMethod = 'toUpperCase'
    
    println obj[usrRequestedProperty]
    println obj."$usrRequestedProperty"
    
    println obj."$usrRequestMethod"()
    println obj.invokeMethod(usrRequestMethod,null)
&#125;

printInfo 'hello'
[104, 101, 108, 108, 111]
[104, 101, 108, 108, 111]
HELLO
HELLO

要迭代一个对象的所有属性,我们可以使用properties属性(或者getter)

如下:

'hello'.properties.each &#123;
    println it
&#125;

使用MOP拦截方法

在Groovy中可以非常方便的实现AOP编程,比如方法拦截或者方法建议.before advice | after advice | around advice.

使用GroovyInterceptable拦截方法

如果一个Groovy对象实现了GroovyInterceptable接口,那么当调用改对象上的任何一个方法时,不管是存在的还是不存在的,被调用的都将是invokeMethod().也就是说,GroovyInterceptable的invokeMethod方法劫持了该对象上的所有方法调用

如果想要实现环绕建议,只需要在这个方法内实现我们的逻辑.然而想实现前置逻辑或后置建议或者both,我们首先要实现自己的前置/后置逻辑,然后在恰当的时机路由到真实的方法,要路由调用,我们将使用MetaMethod,它可以从MetaClass获得

ps:

对于其他Groovy对象(没有实现上述接口的,只有调用到不存在的方法的时候才会调用该方法.有个例外,如果我们在一个对象的MetaClass上实现了invokeMethod不管方法存在与否,都会调用到该方法.

例子:

class Car implements GroovyInterceptable&#123;
    def check()&#123;
        System.out.println("check called ...")
    &#125;
    
    def start()&#123;
        System.out.println("start called ...")
    &#125;
    
    def drive()&#123;
        System.out.println "drive called"
    &#125;
    
    def invokeMethod(String name, args)&#123;
        System.out.println "Called to $name intercepted"
        if (name != 'check')&#123;
            System.out.print('running filter')
            Car.metaClass.getMetaMethod('check').invoke(this,null)
        &#125;
        def validMethod = Car.metaClass.getMetaMethod(name,args)
        if (validMethod != null)&#123;
            validMethod.invoke(this,args)
        &#125;else&#123;
            Car.metaClass.invokeMethod(this,name,args)
        &#125;
    &#125;
&#125;

car = new Car()
car.start()
car.drive()
car.check()
try &#123;
    car.speed()
&#125;catch (e)&#123;
    println e
&#125;
Called to start intercepted
running filtercheck called ...
start called ...
Called to drive intercepted
running filtercheck called ...
drive called
Called to check intercepted
check called ...
Called to speed intercepted
running filtercheck called ...
groovy.lang.MissingMethodException: No signature of method: Car.speed() is applicable for argument types: () values: []
Possible solutions: sleep(long), sleep(long, groovy.lang.Closure), split(groovy.lang.Closure), check(), start(), inspect()

使用MetaClass拦截方法

使用GroovyInterceptable拦截了方法的调用,这种方式适合拦截作者是我们自己的类中的方法.然而,如果我们无权修改类的源代码,或者这个类是个Java类,就行不通了,此外,我们也可能在运行时决定基于某些条件或应用状态开始拦截调用,对于这几种情况,我们可以在MetaClass上实现invokeMethod()方法,并以此来拦截方法.

class Car&#123;
    def check()&#123;
        System.out.println("check called ...")
    &#125;
    
    def start()&#123;
        System.out.println("start called ...")
    &#125;
    
    def drive()&#123;
        System.out.println "drive called"
    &#125;
&#125;

Car.metaClass.invokeMethod = &#123;
    String name, args ->
        System.out.println("Call to $name intercepted ... ")
        if (name != 'check')&#123;
            System.out.print"Running filter"
            Car.metaClass.getMetaMethod('check').invoke(delegate,null)
        &#125;
        
        def validMethod = Car.metaClass.getMetaMethod(name,args)
        if (validMethod != null)&#123;
            validMethod.invoke(delegate,args)
        &#125;else &#123;
            Car.metaClass.invokeMissingMethod(delegate,name,args)
        &#125;
&#125;

car = new Car()

car.start()
car.drive()
car.check()

try &#123;
    car.speed()
&#125;catch (e)&#123;
    println e
&#125;
Read More
post @ 2017-08-22

[TOC]

闭包

闭包是一种可执行的代码块的方法,闭包也是对象,可以想方法一样传递参数。由于闭包是代码块,因此也可以在需要时执行。定义闭包的时候可以使用一个或者多个参数。闭包可以访问属性信息,意味着可以访问并修其作用于内的所有变量值。

闭包

def greeting = 'hello'
def clos = &#123;
    param ->
        println "$greeting $param"
&#125;

clos.call("world")

greeting = 'welcome'
clos.call('world')

def demo(clos)&#123;
    def greeting = 'Bonjour'//this will not affect closure
    clos.call('ken')
&#125;

demo(clos)   //output welcome ken

以上代码说明,只有闭包被定义且存在,而不是在被调用时,可以访问其状态值。

闭包也常用在集合中。使用闭包可以更高效的遍历元素。

1.upto(10,&#123;
    println it 
&#125;)
//或者你也可以这么写
1.upto(10)&#123;
    println it
&#125;
//阶乘
def fac = 1
1.upto(5)&#123;
    num ->
        fac *= num
&#125;

println "Factorical : $fac"

闭包与集合和字符串

常用each方法来遍历。

find()返回第一个满足条件的元素,findAll()返回所有满足条件的元素

def list = [1, 2, 3, 4, 5, 6, 7, 8, 9]
list.findAll &#123;
    it > 5
&#125;.each &#123;
    println it
&#125;

any() and every()

def list = [1, 2, 3, 4, 5, 6, 7, 8, 9]

def anyEle = list.any &#123;
    it > 5
&#125;
println anyEle //true

def everyEle = list.every &#123;
    it > 5
&#125;

println everyEle  //false

collect() and inject

collect用来遍历集合并且返回一个集合


def list = [1, 2, 3, 4, 5, 6, 7, 8, 9]

//collect 返回一个由closure转换后的集合
def newlist = list.collect &#123;
    it * it
&#125;

println newlist

//collect 的高级范例
def doubles = &#123;
    item ->
        2 * item
&#125;

def triples = &#123;
    item ->
        3 * item
&#125;

def isEven = &#123;
    item -> 
        item%2 == 0
&#125;
def map(clos,list)&#123;
    return list.collect(clos)
&#125;

inject用来遍历集合,首先将需要传递的值和集合项目传递给必报,此时其传递的值将作为处理结果,然后再和下一个集合项目一起传递给闭包,以此类推

def factorial = [2, 3, 4, 5]
        .inject(1) &#123;
    previous, element ->
        previous * element
&#125;

println factorial
//=====
def list = [2, 3, 4, 5]
factorial = list.inject(1) &#123;
    prviouse, element ->
        prviouse * element
&#125;
println factorial
//=====
def list = [2, 3, 4, 5]
def closure = &#123;
    previous, element ->
        previous * element
&#125;

def factorial = list.inject (1,closure)
println factorial

闭包的其他特性

由于闭包也是一个对象,因此它可以作为方法的参数,同时也可以作为另一个闭包的参数。

作为方法的参数

def filter(list, predict) &#123;
    return list.findAll(predict)
&#125;

def isEven = &#123;
    x ->
        return x % 2 == 0
&#125;

def isOdd = &#123;
    x ->
        return !isEven(x)
&#125;

def table = [11, 12, 13, 14]

def evens = filter(table,isEven)
println evens

def odds = filter(table,isOdd)
println odds

作为另一个闭包的参数

def takewhile = &#123;
    predicate, list ->
        def result = []
        for (element in list) &#123;
            if (predicate(element)) &#123;
                result << element
            &#125; else &#123;
                return result
            &#125;
        &#125;
&#125;

def isEven = &#123;
    x ->
        return x % 2 == 0
&#125;

def isOdd = &#123;
    x ->
        return !isEven(x)
&#125;

def table1 = [12, 14, 15, 18]
def table2 = [11, 13, 15, 16, 18]

def evens = takewhile.call(isEven,table1)
println evens

作为返回值

def multiply(x)&#123;
    return &#123;
        y->
            return x * y
    &#125;
&#125;

def twice = multiply(2)

println twice(4)

嵌套闭包

选择排序算法的实现

def selection = &#123;
    list ->
  //交换两个位置的数
        def swap = &#123;
            sList, p, q ->
                def temp = sList[p]
                sList[p] = sList[q]
                sList[q] = temp
        &#125;
  //找出最小数位置
        def minimumPosition = &#123;
            pList, from ->
                def mPos = from
                def nextFrom = 1 + from
                for (j in nextFrom..<pList.size) &#123;
                    if (pList[j] < pList[mPos]) &#123;
                        mPos = j
                    &#125;
                &#125;
                return mPos
        &#125;
        def size = list.size() - 1
        for (k in 0..<size) &#123;
            def minPos = minimumPosition(list, k)
            swap(list, minPos, k)
        &#125;
        return list
&#125;

def table = [13, 14, 12, 11, 14]
def sorted = selection(table)
println sorted

关于闭包的更多信息

闭包和不确定性

先看一个例子,闭包在实参列表外部。如果方法的最后一个参数是闭包,那么可以将它从实参列表中删除,并放在气候的括号后面。

demo(closure) 变为 demo closure

def greeting = 'Hello'
def clo = &#123;
    param ->
        println "$greeting $param"
&#125;

def demo(clos) &#123;
    def greeting = 'Bonjour'
    clos.call('Ken')
&#125;
//demo()clo error null point exception,解释见后。
 
demo clo

demo() &#123;
    param ->
        println "welcome $param"
&#125;

假设clos是一个闭包变量,{...}是一个闭包体。假设xy是两个随意设置的值,则查看如下不同的方法调用语句:

method(x,y,&#123;...&#125;) //ok
method(x,y)&#123;...&#125; //ok
method(x,y,clos) //ok
method(x,y)clos //error no such method

第二行代码把闭包体直接放在调用参数的后面。第四行代码说明,同样的做法也许不适用闭包变量。Groovy解释器无法忍冬clos标识符是该方法的调用的一部分,因此Groovy解释器就会报错,说明找不到只有具有两个参数的method方法。

如果method标识具有一个参数的方法:

def method(c)&#123;
  ...
&#125;

则clos是个闭包变量,{…}是闭包体,如下调用语句

method(&#123;...&#125;)  //ok
method()&#123;...&#125;  //ok
method&#123;...&#125;    //ok    
method(clos)   //ok
method()clos   //error null point exception 
method clos    //ok

第五行代码中,调用方法时不适用任何实参,在该方法体中,形参将被初始化为null,在这个方法中使用闭包变量将会导致系统错误。

闭包和方法

对于如下两个结构

def mDouble = &#123;
    n ->
          return 2*n
&#125;

def mDouble(n)&#123;
    return 2*n
&#125;

前者是一个闭包定义,后者是一个方法定义。注意,任何闭包引用肯定有固定的作用域。不能出现同名的闭包变量,但是可以出现同名方法(方法重载)

默认参数

像方法一样,闭包也可以被分配带默认值的参数。

def greeting = &#123;
    msg, name = "leo" ->
        println "$msg $name"
&#125;

greeting("hello ")
greeting("hello", "julia")

闭包和作用域

上面讲到的局部闭包实现的选择性排序算法。下面讲一个使用冒泡算法排序。

def bubbleSort = &#123;
    list ->
        def swap = &#123;
            sList, p, q ->
                def temp
                temp = sList[q]
                sList[q] = sList[p]
                sList[p] = temp
        &#125;

        def size = list.size()
        def sortedPosition = 0

        while (sortedPosition < size) &#123;
            for (index in 1..<(size - sortedPosition)) &#123;
                if (list[index] < list[index - 1])
                    swap(list, index, index - 1)
            &#125;
            sortedPosition ++ 
        &#125;
        return list
&#125;

def list = [1,5,4,6,2,7,0,78,54,23]
bubbleSort(list)
println list

需要注意的是,闭包只能由语句组成,这意味着闭包中不能有方法定义,因此局部闭包swap不能使用方法定义来替代。

递归闭包

用递归的方法求n!

def factorial = &#123;
    n ->
        return n == 0 ? 1 : n * call(n - 1)
&#125;

println factorial(5)

状态类型

可以使用参数和返回值的动态类型来定义闭包。这个特性使得闭包更加通用。

闭包的动态类型

def times = &#123;
    x, y ->
        return x * y
&#125;

def times = &#123;
    x, y ->
        return x * y
&#125;

println times(3,4)
println times(3.2,4.15)
println times('hello',4)

在调用时,才确定x和y的类型

12
13.280
hellohellohellohello

静态指定参数类型的闭包

def times = &#123;
    Number x, Number y ->
        return x * y
&#125;

这种方式就限定了闭包的参数类型,不能是Number及其子类意外的其他类型。

有关实参的约定

在调用闭包时,实参的数量必须严格匹配闭包定义时的形参数量。否则,Groovy解释器就会报错,指示参数不正确。

def clos = &#123;
    a,b,c ->
   "clos($a$b$c)"
&#125;

clos(1,2,3) //ok
clos(1) //error
clos(1,2,3,4) //error

闭包、集合、范围

列表、映射、和范围等类型提供很多实用闭包作为参数的方法,这有利于迭代处理集合或者范围中的每个元素,并执行指定的任务。

迭代器方法

方法名称 说明
any*
collect*
collect*
each*
every*
find*
findAll*
findIndexOf*
inject*
reverseEach*
sort*

Return 语句

我们先看一个代码范例:

def isMemberA(item, list) &#123;
    def size = list.size()
    for (index in 0..<size) &#123;
        if (list[index] == item)
            return true
    &#125;
    return false
&#125;

def isMemberB(item, list) &#123;
    list.each &#123;
        if (it == item)
            return true
    &#125;
    return false
&#125;
def numbers = [11, 12, 13, 14]

println isMemberA(15,numbers)
println isMemberA(13,numbers)

println isMemberB(15,numbers)
println isMemberB(13,numbers)  //这个有问题

输出为:

false
true
false
false

显然,Groovy方式的返回是有问题的。这个是为什么呢?

在我们的范例中,作为实参的闭包包含一个return语句。闭包返回true,就会导致while循环继续处理列表中的下一个项目。

可以看一下each的实现方式

    public static <T> Iterator<T> each(Iterator<T> self, @ClosureParams(FirstGenericType.class) Closure closure) &#123;
        while(self.hasNext()) &#123;
            Object arg = self.next();
            closure.call(arg);
        &#125;

        return self;
    &#125;

可以看到return是指返回的closure.call()但是外层循环还是在的,并不能直接终止循环,因此最终所有的数都会跑一边,这个是一个比较需要注意的地方,在使用each进行迭代的时候一定要注意哦!

高级闭包

假设某家超时使用特殊的商品价格来吸引新客户,以及维护已经有的客户。在一周内,也许早餐谷类视频的价格优惠1/3;在另一周内,优惠政策可能变化,化妆品销售按照买一送一的方式进行销售。在这种优惠政策经常变化的环境中,需要某种灵活的方式来定义这些“业务规则”,并且能够灵活的修改和调整。

此处的思路来源多范式编程方式,这是Groovy的一个非常重要的特性。借助更高级的函数,函数编程范式综合了多台、组合以及计算模式。

简单闭包

以前,把闭包描述为一个代码块。闭包实现参数化更加有价值,可以被引用,可以被当做参数传入方法,以及可以与call消息一起被调用。

范例:计算两个数值参数的乘积

def multiply = &#123;
    x, y ->
        return x * y
&#125;

println "multiply(3,4) = $&#123;multiply(3,4)&#125;"
println "multiply(3.4,5.6) = $&#123;multiply(3.4,5.6)&#125;"

由于闭包可以引用对象的状态。

范例:作用域和闭包

def multiplier = 2 
def multiply = &#123;
    x -> 
        return x * multiplier
&#125;
println "multiply(3) = $&#123;multiply(3)&#125;"
println "multiply(5.6) = $&#123;multiply(5.6)&#125;"

multiplier = 3

println "multiply(3) = $&#123;multiply(3)&#125;"
println "multiply(5.6) = $&#123;multiply(5.6)&#125;"

在闭包定义范围内的变量可以从闭包代码内访问。

闭包是可以将另一个闭包返回的,类似一个二阶的函数

范例:闭包返回值

def add = &#123;
    x, y ->
        return x + y
&#125;

def subtract = &#123;
    x, y ->
        return x - y
&#125;

def multiply = &#123;
    x, y ->
        return x * y
&#125;

def divide = &#123;
    x, y ->
        return x / y
&#125;

def arithmetic = &#123;
    arith ->
        switch (arith) &#123;
            case 'ADD':
                return add
            case 'SUBTRACT':
                return subtract
            case 'MULTIPLY':
                return multiply
            case 'DIVIDE':
                return divide
            default:
                return add
        &#125;
&#125;

def addOperation = arithmetic('ADD')
def mulOperation = arithmetic('MULTIPLY')

println "addOperation(3,4) = $&#123;addOperation(3,4)&#125;"
println "mulOperation(3,4) = $&#123;mulOperation(3,4)&#125;"
println arithmetic('DIVIDE')(3,4)

部分应用

在上面的范例2中,multiply闭包计算一个参数和内部变量multiplier的乘积。现在,如果把multiplier作为闭包的参数,这个闭包返回multiply闭包,后者计算自己的参数与multiplier的成绩,这就是闭包部分应用的范例。

范例:partial applicaiton

def multiply = &#123;
    x, y ->
        return x * y
&#125;

def tripple = multiply.curry(3)
def quadroup = multiply.curry(4)

def twelve = multiply.curry(3,4)
println tripple(3)
println quadroup(5)
println twelve()

**注意:表达式multiply.curry(3)**表示把参数乘以3的闭包。然后,被返回的闭包使用一个参数进行调用。在数学家Haskell Curry之后,闭包的部分应用被称为修正。闭包triple的定义如下:

def triple = &#123;
    y ->
          return 3 * y
&#125;

其中,第一个参数被删除,所有出现第一个参数的地方使用数字3来替代。

加法和惩罚被称为可交换操作。这意味着A+B = B+A and A*B = B*A。但是减法和除法是不可交换的操作。我们可以事件类似于multiply的闭包。

范例:实现可交换操作

def rSubtract = &#123;
    y, x ->
        return x - y
&#125;
def lSubtract = &#123;
    x, y ->
        return x - y
&#125;
def subtract10 = rSubtract.curry(10)
def subractFrom20 = lSubtract.curry(20)

println subtract10(22)
println subractFrom20(14)

关于修正闭包的一个重点是:curry方法的实参数量绝对不能超过该必报所需的实参实际数量。比如该闭包有有三个参数,则调用curry方法时,可以使用零个,一个,两个,或者三个实参。

部分应用可以被认为是一种简化形式,是个复杂任务可以被分解为多个子任务。

组合

结构化顺序的一种组织方式是顺序执行多个任务。通常而言,每部分任务被分别设计和实现。在此,也许认为,一个闭包标识需要执行的某个简单任务。适用组合概念进行任务合并,可以非常容易构造出复杂的任务。并且,借助不同的祝贺方式,可以较快的创建超时所需要的新任务,本文开篇所述案例。

范例:闭包组合

范例演示了composition闭包,这个闭包有两个参数f和g,两个参数代表闭包,把闭包g应用到x比如g(x),把闭包f应用到处理结果比如(fg(x))

def composition = &#123;
    f, g, x ->
        println "f:$&#123;f.class&#125; g: $&#123;g.class&#125; x: $&#123;x.class&#125;"
        return f(g(x))
&#125;

def composition2 = &#123;
    f, g, x ->
        return f(x) * g(x)
&#125;

def multiply = &#123;
    x, y ->
        return x * y
&#125;

def triple = multiply.curry(3)
def quadroup = multiply.curry(4)

def twelveTimes = composition.curry(triple, quadroup)
def multiplyCompo = composition2.curry(triple,quadroup)

println "twelveTimes(12) = $&#123;twelveTimes(12)&#125;" //(3*(4 * 12)) = 144
println "multiplyCompo(12) = $&#123;multiplyCompo(12)&#125;" // 3*12 * 4*12 = 1728

闭包triple有一个参数,并把这个参数与3相乘。闭包twelveTimes是闭包tripe和quadroup的组合。结果是,闭包twelveTimes把参数乘以4,然后把乘法结果与3相乘。

范例:组合与集合

def composition = &#123;
    f, g, x ->
        return f(g(x))
&#125;

def multiply = &#123;
    x, y ->
        return x * y
&#125;

def triple = multiply.curry(3)
def quadroup = multiply.curry(4)

def twelveTimes = composition.curry(triple,quadroup)

def table = [1,2,3,4].collect&#123;
    element ->
        return twelveTimes(element)
&#125;
println "tabl = $table "

计算模式

介绍一种机制,是的闭包包含一种计算模式。

范例是对列表中的每个元素按照某中形式进行转换。这种转换通常被命名为map

范例:映射

//map closure
def map = &#123;
    clos, list ->
        return list.collect(clos)
&#125;

//composition closure
def compositon = &#123;
    f ,g ,x ->
        return f(g(x))
&#125;

def multiply = &#123;
    x , y ->
        return x * y
&#125;

def triple = multiply.curry(3)
def quadroup = multiply.curry(4)

def tripleAll = map.curry(triple)


def table = tripleAll([1,2,3,4])
println table

分析:

//实际的trpleAll将是一个CurryedClosure
//quadroup的结构
quadroup = &#123;
    list -> 
          return list.collect&#123;
              element ->
                  return 3 * element 
          &#125;
&#125;

关于映射的一个等级模式是,如果把闭包(比如f)映射到列表x,然后把闭包(比如g)应用到前一个闭包的处理结果。那么上述过程就等价于把g和f的组合应用到这个列表x。

范例:处理等价关系

//map closure
def map = &#123;
    clos, list ->
        return list.collect(clos)
&#125;

//composition closure
def compositon = &#123;
    f, g, x ->
        return f(g(x))
&#125;

def multiply = &#123;
    x, y ->
        return x * y
&#125;

def triple = multiply.curry(3)
def quadroup = multiply.curry(4)

def composeMapMap = compositon.curry(map.curry(triple), map.curry(quadroup))

def table = composeMapMap([1,2,3,4]) // each element * 4 * 3

println table

业务规则

现在我们考虑如何计算一个Book的净价,在计算过程要考虑到上品折扣和政府税金,比如增值税。

关于业务规则的实际实现

范例:净价计算

class Book &#123;
    def name
    def author
    def price
    def category
&#125;

def bk = new Book(name: 'Groovy', author: 'KenB', price: 25, category: 'CompSci') // 参数列表初始化

def discountRate = 0.1
def taxRate = 0.17

def rMultiply = &#123;
    y , x ->
        return x * y
&#125;

def lMultiply = &#123;
    x , y ->
        return x * y
&#125;

def composition = &#123;
    f,g,x ->
        return f(g(x))
&#125;

def calDiscounteedPrice = rMultiply.curry(1-discountRate)
def calTax = rMultiply.curry(1 + taxRate)
def calcNetPrice = composition.curry(calTax,calDiscounteedPrice)

def netPrice = calcNetPrice(bk.price)

println "netPrice = $&#123;netPrice&#125;"

范例:有上限折扣

class Book &#123;
    def name
    def author
    def price
    def category
&#125;

def bk = new Book(name: 'Groovy', author: 'KenB', price: 25, category: 'CompSci')

def discountRate = 0.1
def taxRate = 0.17
def maxDiscount = 3

def rMultiply = &#123;
    y, x ->
        return x * y
&#125;

def lMultiply = &#123;
    x, y ->
        return x * y
&#125;

def subtract = &#123;
    x, y ->
        return x - y
&#125;

def rSubtract = &#123;
    y, x ->
        return x - y
&#125;

def lSubtract = &#123;
    x, y ->
        return x - y
&#125;

def min = &#123;
    x, y ->
        return x < y ? x : y
&#125;

def id = &#123;
    x ->
        return x
&#125;

def composition = &#123;
    f, g, x ->
        return f(g(x))
&#125;

def bComposition = &#123;
    h, f, g, x ->
        return h(f(x), g(x))
&#125;

def calcDiscount = rMultiply.curry(discountRate)
def calcActuralDiscount = bComposition.curry(min, calcDiscount, id)
def calcDiscountedPrice = bComposition.curry(subtract, id, calcActuralDiscount)
def calcTax = rMultiply.curry(1 + taxRate)
def calcNetPrice = composition.curry(calcTax,calcDiscountedPrice)

println "bk.price : $bk.price"

def netPrice = calcNetPrice(bk.price)

println "netprice = $netPrice"

打包

以上范例开发了大量非常有价值的闭包,可以非常灵活的合并使用。因此,有必要把这些闭包都打包到一个类中去,这样更加容易引入到应用程序。

abstract class Functor {
    public static Closure bAdd = {
        x, y -> return x + y
    }

    public static Closure rAdd = {
        y, x -> return x + y
    }
    
    public static Closure bSubtract = {
        x , y -> return x - y
    }
    //blabla
}

这个类包含了算数的闭包。

闭包与协程

调用一个函数或方法会在程序的执行序列创建一个新的作用域.我们会在一个入口点进入函数.在方法完成之后,回到调用者的作用域.

协程(Coroutine)则支持多个入口点,每个入口点都是上次挂起调用的位置.我们可以进入一个函数,执行部分代码,挂起,在回到调用者的上下文或作用域内执行一些代码.之后我们可以在挂起的地方恢复该函数的执行.

写成对于实现某些特殊的逻辑或算法非常方便,比如用着生产者-消费者问题中.生产者会接受一些输入,对输入做一些厨师处理,通知消费者拿走处理过的值并做进一步计算,并输出或存出结果.消费者处理它那部分工作,完成之后通知生产者以获取更多输入.

在Java中,wait() and notify()与多线程借个使用,可以实现协程.闭包会让人产生”协程是在一个线程中执行”的感觉or错觉.

def iterate(n, closure)&#123;
    1.upto(n)&#123;
        println "In iterate with value $&#123;it&#125;"
        closure(it)
    &#125;
&#125;

println "Calling iterate"
total = 0
iterate(4)&#123;
    total += it
    println "In closure total so far is $&#123;total&#125;"
&#125;
println "Done"
/**
每次调用闭包,我们都会从上一次调用中回复total的值.  //可是我并没有从例子中看出什么是协程????
*/

协程不是进程或线程,其执行过程更类似于子例程,或者说不带返回值的函数调用。 协程还是比较复杂,嗯后续在研究研究.

闭包委托

Groovy的闭包支持方法委托,而且提供了方法分派能力.

this,owner and delegate是闭包的三个属性,用于确定有那个对象处理闭包内的方法调用,一般而言,delegate 会被设置为 owner,但是对其进行修改,可以有非常好的元编程能力.

利用闭包委托,可以更好的写出DSL,将在DSL好好的讲述本内容.

题外话

有关函数式编程,可参考阮一峰老师的博客,在这里引用阮一峰老师的博客,特此注明,并非常感谢老师能够出一片教程给大家科普一下。

函数式编程入门教程–阮一峰

ps:自己的一些理解

对于函数式编程中的柯里化,对应高中数学的只是,其实就是函数的一个组合。为了组合函数,需要将多个多参数函数转换成单参数函数。

举个🌰:
$$
z = x + y
$$

$$
z = x * y
$$

如果我想得到一个复合函数使得2->映射到8,计算过程为2 * 3 + 2

那么我怎么得到这个函数呢?定义这个映射为f
$$
f(x) = x * 3 + 2
$$
那么在程序中我们怎么体现呢

//这里的函数都是以闭包形式表示的准确来说这不是一个"方法",而是一个闭包的对象
//首先我们需要一个加法函数,这个加法函数是一个广义的
def add = &#123;
    x, y ->
        return x + y
&#125;
//然后我们需要一个乘法函数,同样是一个广义的
def multiple = &#123;
    x, y ->
        return x * y
&#125;
//然后我们定义一个组合,这个组合是嵌套函数,两个映射f,g和一个自变量x
def compose = &#123;
    f, g, x ->
        return f(g(x))
&#125;

//add.curry(2)  :  y = 2 + z
//multiple.curry(2)  : z = 3 * x 注:这里只是为了方便,变量名并不代表带入关系
//compose.curry(add2,multiple3) = : z = 2 + (3 * x)
def add2 = add.curry(2)
def multiple3 = multiple.curry(3)

def addAndMultiple = compose.curry(add2,multiple3)
println addAndMultiple(2)
Read More
⬆︎TOP